GeoNode Docker Installation
Overview
The preferred way to deploy GeoNode is via Docker containers. The following section will be a guide on how to accomplish it.
This section assumes that you are aware of Docker and containerization technology. If not, please check our sub-section Docker 101 containing a brief introduction to this.
Docker Setup
# install OS level packages..
sudo add-apt-repository universe
sudo apt-get update -y
sudo apt-get install -y git-core git-buildpackage debhelper devscripts python3.10-dev python3.10-venv virtualenvwrapper
sudo apt-get install -y apt-transport-https ca-certificates curl lsb-release gnupg gnupg-agent software-properties-common vim

# add docker repo and packages...
sudo mkdir -p /etc/apt/keyrings
curl -fsSL https://download.docker.com/linux/ubuntu/gpg | sudo gpg --dearmor -o /etc/apt/keyrings/docker.gpg
sudo chmod a+r /etc/apt/keyrings/docker.gpg
echo "deb [arch=$(dpkg --print-architecture) signed-by=/etc/apt/keyrings/docker.gpg] https://download.docker.com/linux/ubuntu $(lsb_release -cs) stable" | sudo tee /etc/apt/sources.list.d/docker.list > /dev/null

sudo apt-get update -y
sudo apt-get install -y docker-ce docker-ce-cli containerd.io docker-compose
sudo apt autoremove --purge

# add your user to the docker group...
sudo usermod -aG docker ${USER}
su ${USER}

docker --version
$> Docker version 26.1.3, build b72abbb
Upgrade docker-compose to the latest version
DESTINATION=$(which docker-compose)
sudo apt-get remove docker-compose
sudo rm $DESTINATION
VERSION=$(curl --silent https://api.github.com/repos/docker/compose/releases/latest | grep -Po '"tag_name": "\K.*\d')
sudo curl -L https://github.com/docker/compose/releases/download/${VERSION}/docker-compose-$(uname -s)-$(uname -m) -o $DESTINATION
sudo chmod 755 $DESTINATION

docker-compose --version
$> Docker Compose version v2.27.1
Create an instance of your geonode-project
NOTE: You can call your GeoNode project whatever you like except ‘geonode’. Follow the naming conventions for python packages (generally lower case with underscores (_)).
Let’s say your project is named my_geonode perform the following steps:
python3.10 -m venv /home/geonode-vm-321/.virtualenvs/my_geonode
source /home/geonode-vm-321/.virtualenvs/my_geonode/bin/activate

pip install Django==4.2.17
cd /opt
sudo mkdir my_geonode
sudo chown -Rf ${USER}: my_geonode/

GN_VERSION=4.4.2

django-admin startproject --template=https://github.com/GeoNode/geonode-project/archive/refs/tags/$GN_VERSION.zip -e py,sh,md,rst,json,yml,ini,env,sample,properties -n monitoring-cron -n Dockerfile my_geonode my_geonode/
Set Environment Variables create a .env file using the available .env.sample
Assign values to the following variables in the .env:
cd my_geonode

python create-envfile.py \
      --hostname localhost \
      --email admin@email.com \
      --geonodepwd admin \
      --geoserverpwd geoserver \
      --pgpwd postgres \
      --dbpwd geonode \
      --geodbpwd geonode \
      --clientid Jrchz2oPY3akmzndmgUTYrs9gczlgoV20YPSvqaV \
      --clientsecret rCnp5txobUo83EpQEblM8fVj3QT5zb5qRfxNsuPzCqZaiRyIoxM4jdgMiZKFfePBHYXCLd7B8NlkfDBY9HKeIQPcy5Cp08KQNpRHQbjpLItDHv12GvkSeXp6OxaUETv3
Startup the containers
# Shutdown all the running services
sudo systemctl stop uwsgi
sudo systemctl stop tomcat9
sudo systemctl stop nginx
sudo pkill -9 -f uwsgi

# Build and start the docker containers
docker-compose build --no-cache
docker-compose up -d

# On the first install, db migrations have to be made...this will take a while
# Check the django container logs while you wait...

docker-compose logs -f django
Connect to http://localhost/
The startup typically takes some time, so be patient…
If everything goes well, you should be able to see a line, similar to the following one, in the geonode startup logs:
<some date> [UWSGI] Uwsgi running...
Connect to http://localhost/
The default credentials are:
GeoNode (http://localhost/) admin:
username: adminpassword: adminGeoServer (http://localhost/geoserver/) admin:
username: adminpassword: geoserver
Deploy GeoNode on a production server (e.g.: http://my_geonode.geonode.org/)
In the case you would like to deploy to, let’s say, http://my_geonode.geonode.org/, you will need to change the .env file as follows:
# backup original .env file
cp .env .env.bak
vim .env
--> replace http://localhost with http://my_geonode.geonode.org everywhere (:%s/localhost/my_geonode.geonode.org/g)
vim /etc/hosts
--> create an alias to your localhost: 127.0.0.1      my_geonode.geonode.org
Restart the containers
Whenever you change something in the .env file, you will need to rebuild the container
Warning
Be careful! The following command drops any change you might have done manually inside the containers, except for the static volumes.
docker-compose up --build -d
Troubleshooting
If for some reason you are not able to reach the server on the HTTPS channel, please check the NGINX configuration files below:
Enter the NGINX container
docker-compose exec geonode sh
Install an editor if one is not present
apk add nano
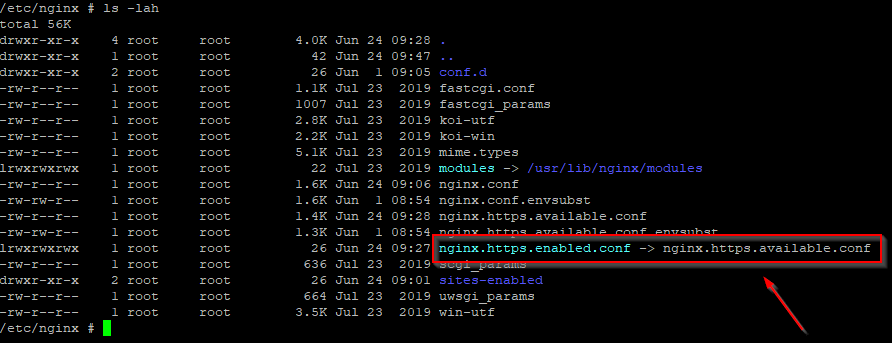
Double check that the
nginx.https.enabled.conflink has been correctly createdls -lah
If the list does not exactly match the figure above, please run the following commands, and check again
rm nginx.https.enabled.conf
ln -s nginx.https.available.conf nginx.https.enabled.conf
Inspect the content of
nginx.https.enabled.confnano nginx.https.enabled.confMake sure the content matches the following
Warning
Change the Hostname accordingly. This is only an example!
# NOTE: $VARIABLES are env variables replaced by entrypoint.sh using envsubst
# not to be mistaken for nginx variables (also starting with $, but usually lowercase)

# This file is to be included in the main nginx.conf configuration if HTTPS_HOST is set
ssl_session_cache   shared:SSL:10m;
ssl_session_timeout 10m;

# this is the actual HTTPS host
server {
    listen              443 ssl;
    server_name         my_geonode.geonode.org;
    keepalive_timeout   70;

    ssl_certificate     /certificate_symlink/fullchain.pem;
    ssl_certificate_key /certificate_symlink/privkey.pem;
    ssl_protocols       TLSv1 TLSv1.1 TLSv1.2;
    ssl_ciphers         HIGH:!aNULL:!MD5;

    include sites-enabled/*.conf;
}

# if we try to connect from http, we are redirected to https
server {
    listen 80;
    server_name  my_geonode.geonode.org; # TODO: once geoserver supports relative urls, we should allow access through both HTTP and HTTPS at the same time and should hence remove HTTP_HOST from this line

    # Except for the let's encrypt challenge
    location /.well-known {
        alias /geonode-certificates/.well-known;
        include  /etc/nginx/mime.types;
    }

    # Redirect to https
    location / {
    return 302 https://my_geonode.geonode.org/$request_uri; # TODO : we should use 301 (permanent redirect, but not practical for debug)
    }
}
Warning
Save any changes and exit!
Reload the NGINX configuration
nginx -s reload
2020/06/24 10:00:11 [notice] 112#112: signal process started
/etc/nginx# exit
It may be helpful to disable https to isolate the source of errors. After reverting the HTTPS-related changes in the .env file, repeat the above steps and ensure that the
nginx.http.enabled.conflink has been correctly created.ln -s nginx.conf nginx.http.enabled.conf nano nginx.http.enabled.conf
Customize .env to match your needs
In the case you would like to modify the GeoNode behavior, always use the .env file in order to update the settings.
If you need to change a setting which does not exist in the .env file, you can force the values inside my_geonode/settings.py
You can add any property here referred to as
Env:PROPERTY_NAME
Restart the containers
Whenever you change something on the .env file, you will need to rebuild the containers.
Warning
Be careful! The following command drops any change you might have manually done inside the containers, except for the static volumes.
docker-compose up -d django