Introduction to Django
This tutorial is referencing parts and wireframes from A Complete Beginner’s Guide to Django - Part 1
Django is a Web framework written in Python. A Web framework is software that supports the development of dynamic Web sites, applications, and services. It provides a set of tools and functionalities that solves many common problems associated with Web development, such as security features, database access, sessions, template processing, URL routing, internationalization, localization, and much more.
Using a Web framework, such as Django, enables us to develop secure and reliable Web applications very quickly and in a standardized way, without reinventing the wheel.
The development of Django is supported by the Django Software Foundation and it’s sponsored by companies like JetBrains and Instagram. Django has also been around for quite some time now. It’s been under active development for more than 12 years now, proving to be a mature, reliable, and secure Web framework.
The basic setup consists of installing Python, Virtualenv, and Django.
Virtual environments
Using virtual environments (virtualenvs) is not mandatory, but it’s highly recommended. If you are just getting started, it’s better to start on the right foot.
When developing Web sites or Web projects with Django, it’s very common to have to install external libraries to support the development. Using virtual environments, each project you develop will have its own isolated environment so that the dependencies won’t clash. It also allows you to maintain projects that run on different Django versions on your local machine.
In order to create a
virtualenv, it is necessary to install some system packages. In an Ubuntu system, for instance, we can rely onPython 3.10andVirtualenverapper
# Install packages from GeoNode core
sudo apt update -y
sudo apt install -y --allow-downgrades build-essential \
    python3-gdal=3.4.1+dfsg-1build4 gdal-bin=3.4.1+dfsg-1build4 libgdal-dev=3.4.1+dfsg-1build4 \
    python3-all-dev python3.10-dev python3.10-venv virtualenvwrapper \
    libxml2 libxml2-dev gettext libmemcached-dev zlib1g-dev \
    libxslt1-dev libjpeg-dev libpng-dev libpq-dev \
    software-properties-common build-essential \
    git unzip gcc zlib1g-dev libgeos-dev libproj-dev \
    sqlite3 spatialite-bin libsqlite3-mod-spatialite libsqlite3-dev
Since GeoNode needs many different python libraries and packages, it’s recommended to use a python virtual environment to avoid conflicts on dependencies with system-wide python packages and other installed software. See also documentation on the Virtualenvwrapper package for more information.
The GeoNode Virtual Environment must only be created the first time. You won’t need to create it again every time.
To create a new
virtualenv
which python3.10  # copy the path of the python executable

# Create a test Virtual Environment (first time only)
export WORKON_HOME=~/.virtualenvs
source /usr/share/virtualenvwrapper/virtualenvwrapper.sh
mkvirtualenv --python=/usr/bin/python3.10 boards  # Use the python path from above

# Alternatively you can also create the virtual env like below
mkdir -p ~/.virtualenvs
python3.10 -m venv ~/.virtualenvs/boards
source ~/.virtualenvs/boards/bin/activate
At this point, your command prompt shows a
(boards)prefix, this indicates that your virtualenv is active.The next time you need to access the Virtual Environment just run
source /usr/share/virtualenvwrapper/virtualenvwrapper.sh
workon boards

# Alternatively you can also activate the virtual env like below
source ~/.virtualenvs/boards/bin/activate
In order to permanently save the virtualenvwrapper environment
vim ~/.bashrc

# Write to the bottom of the file the following lines
export WORKON_HOME=~/.virtualenvs
source /usr/share/virtualenvwrapper/virtualenvwrapper.sh
Whenever you switch projects, or you need to create a new GeoNode or
geonode-projectinstance, make sure to create and activate a specificvirtualenvfor that one.
Django
In order to install Django on a new
virtualenv, you will need to run thepiputility command. Using the formatpip install Django==<version>, e.g.:
# This will use the same Python version of the virtualenv
pip install Django==3.2.18
To start a new Django project, run the command below
cd ~
django-admin startproject myproject
The command-line utility django-admin is automatically installed with Django.
After we run the above command, it will generate the base folder structure for a Django project.
Right now, our myproject directory looks like this:
myproject/                  <-- higher level folder
 |-- myproject/             <-- django project folder
 |    |-- myproject/
 |    |    |-- __init__.py
 |    |    |-- settings.py
 |    |    |-- urls.py
 |    |    |-- wsgi.py
 |    +-- manage.py
 +-- venv/                  <-- virtual environment folder
Our initial project structure is composed of five files:
manage.py: a shortcut to use thedjango-admincommand-line utility. It’s used to run management commands related to our project. We will use it to run the development server, run tests, create migrations, and much more.__init__.py: this empty file tells Python that this folder is a Python package.settings.py: this file contains all of the project’s configurations. We will refer to this file all the time!urls.py: this file is responsible for mapping the routes and paths in our project. For example, if you want to show something in the URL/about/, you have to map it here first.wsgi.py: this file is a simple gateway interface used for deployment. You don’t have to bother about it. Just leave it be for now.
Django comes with a simple web server installed. It’s very convenient during the development, so we don’t have to install anything else to run the project locally. We can test it by executing the command:
python manage.py runserver
For now, you can ignore the migration errors. We will get to that later.
Now open the following URL in a Web browser: http://127.0.0.1:8000 and you should see the following page:
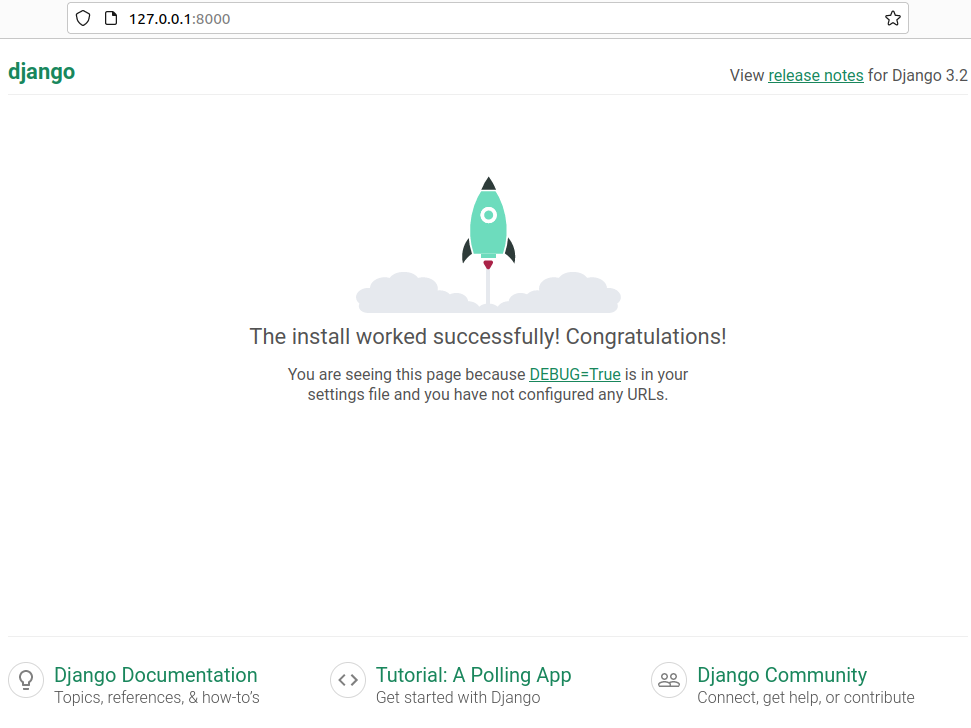
Hit CTRL + C to stop the development server.
MVC Pattern and Django
The MVC pattern
Before the advent of MVC frameworks, web programming mixed database code with the server side code of the page. If you have programmed for some time in a language like PHP you already did this to some extent. This problem is not particular to PHP; In fact, in most server-side languages the code is shared between at least three languages, for example, Python (or PHP), SQL, HTML.
The MVC pattern was created to separate business logic from representation. MVC is the most popular architecture in use today. Many popular frameworks like Ruby on Rails, Laravel, CodeIgniter and even Django uses it. The MVC architecture divides an application into the following three layers:
Model.
View.
Controller.
Let’s discuss each of them separately.
Models: Models represents how data is organized in the database. In other words, in MVC pattern we use models to define our database tables as well as the relationships between them.
Views: A view is what you see when you visit a site. For example, a blog post, a contact form etc, are all examples of views. A View contains all the information that will be eventually sent to the client i.e a web browser. Generally, views are HTML documents.
Controllers: Controller controls the flow of information. When you request a page that request is passed to the controller then it uses programmed logic to decide what information is needed to pull from the database and what information should it pass to the view. The controller is the heart of the MVC architecture because it acts as a glue between models and views.
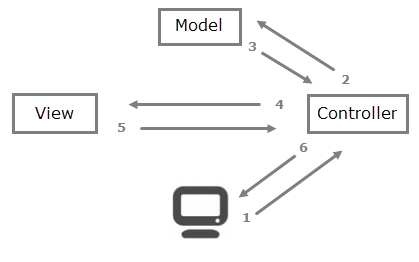
Here is a rundown of steps involved in an MVC blog application.
Web browser or client sends the request to the web server, asking the server to display a blog post.
The request received by the server is passed to the controller of the application.
The controller asks the model to fetch the blog post.
The model sends the blog post to the controller.
The controller then passes the blog post data to the view.
The view uses blog post data to create an HTML page.
At last, the controller returns the HTML content to the client.
The MVC pattern not only helps us to create and maintain a complex application. It really shines when it comes to separation of concerns. For example, In a web development company, there are web designers and there are developers. The job of web designers is to create views. The developers take these views and incorporate them with models and controllers.
Django MTV
Django follows MVC pattern very closely but it uses slightly different terminology. Django is essentially an MTV (Model-Template-View) framework. Django uses the term Templates for Views and Views for Controller. In other words, in Django views are called templates and controllers are called views. Hence our HTML code will be in templates and Python code will be in views and models.
Django Apps
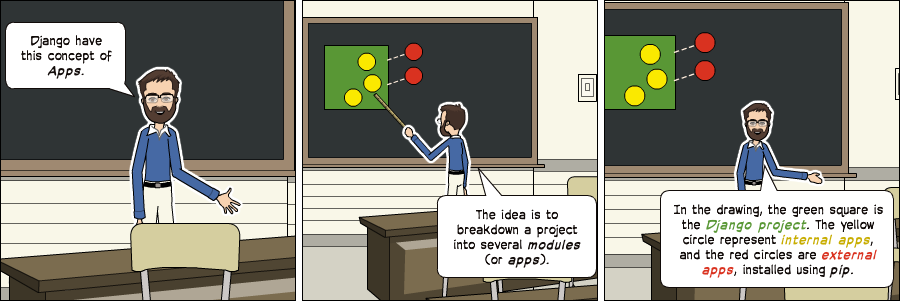
In the Django philosophy we have two important concepts:
app: is a Web application that does something. An app usually is composed of a set of models (database tables), views, templates, and tests.project: is a collection of configurations and apps. One project can be composed of multiple apps or a single app.
It’s important to note that you can’t run a Django app without a project. Simple websites like a blog can be written entirely inside a single app, which could be named blog or weblog for example.
It’s a way to organize the source code. In the beginning, it’s not very trivial to determine what is or is not an app, how to organize the code, and so on. But don’t worry too much about that right now! Let’s first get comfortable with Django’s API and the fundamentals.
Alright! So, to illustrate let’s create a simple Web Forum or Discussion Board. To create our first app, go to the directory where the manage.py file is and execute the following command:
django-admin startapp boards
Notice that we used the command startapp this time.
This will give us the following directory structure:
 |-- myproject/
 |    |-- boards/                <-- our new django app!
 |    |    |-- migrations/
 |    |    |    +-- __init__.py
 |    |    |-- __init__.py
 |    |    |-- admin.py
 |    |    |-- apps.py
 |    |    |-- models.py
 |    |    |-- tests.py
 |    |    +-- views.py
 |    |-- myproject/
 |    |    |-- __init__.py
 |    |    |-- settings.py
 |    |    |-- urls.py
 |    |    |-- wsgi.py
 |    +-- manage.py
So, let’s first explore what each file does:
migrations/: here Django stores some files to keep track of the changes you create in themodels.pyfile. So it is good to keep the database and themodels.pysynchronized.admin.py: this is a configuration file for a built-in Django app calledDjango Admin.apps.py: this is a configuration file of the app itself.models.py: here is where we define the entities of our Web application. The models are automatically translated by Django into database tables.tests.py: this file is used to write unit tests for the app.views.py: this is the file where we handle the request/response cycle of our Web application.
Now that we created our first app, let’s configure our project to use it.
settings.py
INSTALLED_APPS = [
    'django.contrib.admin',
    'django.contrib.auth',
    'django.contrib.contenttypes',
    'django.contrib.sessions',
    'django.contrib.messages',
    'django.contrib.staticfiles',
]
As you can see, Django already comes with 6 built-in apps installed. They offer common functionalities that most Web applications need, like authentication, sessions, static files management (images, javascripts, css, etc.), and so on.
We will explore those apps as we progress in this tutorial series. But for now, leave them be and just add our boards app to the list of INSTALLED_APPS:
INSTALLED_APPS = [
    'django.contrib.admin',
    'django.contrib.auth',
    'django.contrib.contenttypes',
    'django.contrib.sessions',
    'django.contrib.messages',
    'django.contrib.staticfiles',

    'boards',
]
Using the analogy of the square and circles from the previous comic, the yellow circle would be our boards app, and the django.contrib.admin, django.contrib.auth, etc, would be the red circles.
Hello, World!
Let’s write our first view. We will explore it in greater detail in the next tutorial. But for now, let’s just experiment with what it looks like to create a new page with Django.
Open the views.py file inside the boards app, and add the following code:
views.py
from django.http import HttpResponse

def home(request):
    return HttpResponse('Hello, World!')
Views are Python functions that receive an HttpRequest object and returns an HttpResponse object. Receive a request as a parameter and return a response as a result. That’s the flow you have to keep in mind!
So, here we defined a simple view called home which simply returns a message saying Hello, World!.
Now we have to tell Django when to serve this view. This is done inside the urls.py file:
urls.py
from django.contrib import admin
from django.urls import path
from boards import views

urlpatterns = [
    path('', views.home, name='home'),
    path('^admin/', admin.site.urls),
]
Comparing this snippet with the original urls.py file, you will notice two added lines:
path('', views.home, name='home'),: the empty path''is bound to thehomeviewfrom boards import views: just an import that tells which is the referencedviews.home.
If we wanted to match the URL http://127.0.0.1:8000/homepage/, our URL would be: path('^homepage/$', views.home, name='home').
This is just a really simple example. Similarly, we could match URLs defined using regular expressions or also ask Django to parse parameters embedded in the path (for instance, to implement a REST API).
Run the server and let’s see what happens:
python manage.py runserver
In a Web browser, open the http://127.0.0.1:8000 URL:
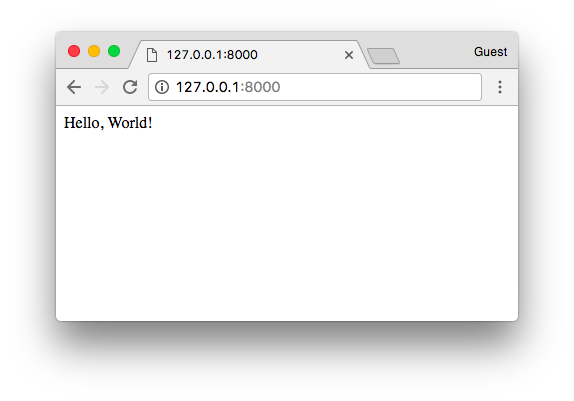
That’s it! You just created your very first view.
Using a Template
In the previous example the view, aka the controller was just returning a static text.
What if we would like to dynamically send a variable to a template and let Django render the outcome?
We’ll need to modify our view as follows:
from django.shortcuts import render
from django.http import HttpResponse

def home(request, template_name="my_homepage.html"):
    response = render(
        request,
        template_name,
        context={
            "my_homepage_welcome_text": "Hello. World!"
        }
    )
    return response
Django will make a scan of all the templates folder present in the applications.
Warning: You will need to restart the server, because those folders are injected at initialization time
mkdir boards/templates
Let’s finally create our template
vim boards/templates/my_homepage.html
Notice how by using some of the Django directives inside the template, we can dynamically read the context created by the view.
<h1>{{ my_homepage_welcome_text }}</h1>
Potentially, a single template can be reused by multiple views. The content will be taken from the context.
Further reading: A Complete Beginner’s Guide to Django - Part 2